I'm a sucker for love so pretty much every day seems like Valentine's Day. Yesterday Cornelius jokingly said that Valentine's Day is the day where you have to prove your love to the other person! After laughing, I decided that I'd bake up some proof right away. After seeing Gourmet's recipe for a Truffle Chocolate Tart pretty much everywhere, I was smitten. Unfortunately, I didn't have really great dark chocolate at my disposal. I did however have some pretty decent semi-sweet baking chocolate and some really amazing imported French dark dark cocoa. I also had some Callebault white chocolate on hand...so I decided to modify the recipe somewhat and knock me out some love cake. Using 2 different chocolates, I decided to marbleize the ganache and create some pretty looking swirls. And since I was using white chocolate which is quite sweet, I did not add extra sugar to the mix. I'm sure it will be sweet and rich enough without the extra sugar! Truth be told, I haven't taken a bite out of this tart (we're saving it for tonight), but every time I lift the lid off my cake dome, I'm instantly salivating from the heavenly chocolate aroma. Oh my! Bring on the love!
chocolate truffle tart
For crust
28 chocolate wafers* (1 1/2 cups)
6 T butter, melted and cooled
For filling
1/2 c okay-quality bittersweet chocolate, coarsely chopped + 2 fine-quality T dark cocoa
1/2 c fine-quality white chocolate, coarsely chopped
6 T butter, cut into 1/2-inch cubes
2 large eggs, lightly beaten
1/2 c heavy cream
1/4 t salt
1 t pure vanilla extract
Special equipment: an 8-inch (20-cm) round springform pan
1. Make crust: Put oven rack in middle position and preheat oven to 350°F. Wrap a sheet of foil over bottom of springform pan (in case of leaks). Lightly butter side of pan. Stir together ground wafers and butter in a bowl until combined, then pat mixture evenly onto bottom of pan and 1 1/2 inches up side. Bake until crust is slightly puffed, about 10 minutes, then cool completely in pan on a rack, about 15 minutes. Leave oven on.
2. Make filling while crust cools: Whisk together eggs, cream, sugar, salt, and vanilla in a bowl. Divide mixture into 2 even halves. Set aside. Over low heat, melt dark chocolate, cocoa and half the butter in one saucepan and melt white chocolate and the other half of the butter in another saucepan. Stir until smooth and remove from heat. Cool for 5 minutes. Whisk the dark chocolate mixture into one of the egg mixtures and add the white chocolate into the other egg mixture and combine well with a whisk.
3. Assemble and bake tart: Pour white filling into cooled crust and then drizzle the chocolate filling over top in a random pattern. With a fork or the end of knife, create swirls being careful not to mix too much. Rap pan once on counter to eliminate any air bubbles. Bake until filling 1 inch from edge is set and slightly puffed but center trembles slightly when pan is gently shaken, 20 to 25 minutes.** (Center will continue to set as it cools.)
4. Cool tart completely in pan on a rack, about 2 hours. Chill, uncovered, until center is firm, about 4 hours. Remove side of pan and serve.
* I didn't have chocolate wafers, so instead I used vanilla wafers and added in a tablespoon or two of dark cocoa.
** It took about 40 minutes for the batter to not be totally liquid. Maybe I just have an old stove.
Wednesday, February 14, 2007
love proof


love proof
I'm a sucker for love so pretty much every day seems like Valentine's Day. Yesterday Cornelius jokingly said that Valentine's Day is the day where you have to prove your love to the other person! After laughing, I decided that I'd bake up some proof right away. After seeing Gourmet's recipe for a Truffle Chocolate Tart pretty much everywhere, I was smitten. Unfortunately, I didn't have really great dark chocolate at my disposal. I did however have some pretty decent semi-sweet baking chocolate and some really amazing imported French dark dark cocoa. I also had some Callebault white chocolate on hand...so I decided to modify the recipe somewhat and knock me out some love cake. Using 2 different chocolates, I decided to marbleize the ganache and create some pretty looking swirls. And since I was using white chocolate which is quite sweet, I did not add extra sugar to the mix. I'm sure it will be sweet and rich enough without the extra sugar! Truth be told, I haven't taken a bite out of this tart (we're saving it for tonight), but every time I lift the lid off my cake dome, I'm instantly salivating from the heavenly chocolate aroma. Oh my! Bring on the love!
chocolate truffle tart
For crust
28 chocolate wafers* (1 1/2 cups)
6 T butter, melted and cooled
For filling
1/2 c okay-quality bittersweet chocolate, coarsely chopped + 2 fine-quality T dark cocoa
1/2 c fine-quality white chocolate, coarsely chopped
6 T butter, cut into 1/2-inch cubes
2 large eggs, lightly beaten
1/2 c heavy cream
1/4 t salt
1 t pure vanilla extract
Special equipment: an 8-inch (20-cm) round springform pan
1. Make crust: Put oven rack in middle position and preheat oven to 350°F. Wrap a sheet of foil over bottom of springform pan (in case of leaks). Lightly butter side of pan. Stir together ground wafers and butter in a bowl until combined, then pat mixture evenly onto bottom of pan and 1 1/2 inches up side. Bake until crust is slightly puffed, about 10 minutes, then cool completely in pan on a rack, about 15 minutes. Leave oven on.
2. Make filling while crust cools: Whisk together eggs, cream, sugar, salt, and vanilla in a bowl. Divide mixture into 2 even halves. Set aside. Over low heat, melt dark chocolate, cocoa and half the butter in one saucepan and melt white chocolate and the other half of the butter in another saucepan. Stir until smooth and remove from heat. Cool for 5 minutes. Whisk the dark chocolate mixture into one of the egg mixtures and add the white chocolate into the other egg mixture and combine well with a whisk.
3. Assemble and bake tart: Pour white filling into cooled crust and then drizzle the chocolate filling over top in a random pattern. With a fork or the end of knife, create swirls being careful not to mix too much. Rap pan once on counter to eliminate any air bubbles. Bake until filling 1 inch from edge is set and slightly puffed but center trembles slightly when pan is gently shaken, 20 to 25 minutes.** (Center will continue to set as it cools.)
4. Cool tart completely in pan on a rack, about 2 hours. Chill, uncovered, until center is firm, about 4 hours. Remove side of pan and serve.
* I didn't have chocolate wafers, so instead I used vanilla wafers and added in a tablespoon or two of dark cocoa.
** It took about 40 minutes for the batter to not be totally liquid. Maybe I just have an old stove.
Thursday, December 21, 2006
have a boozy christmas
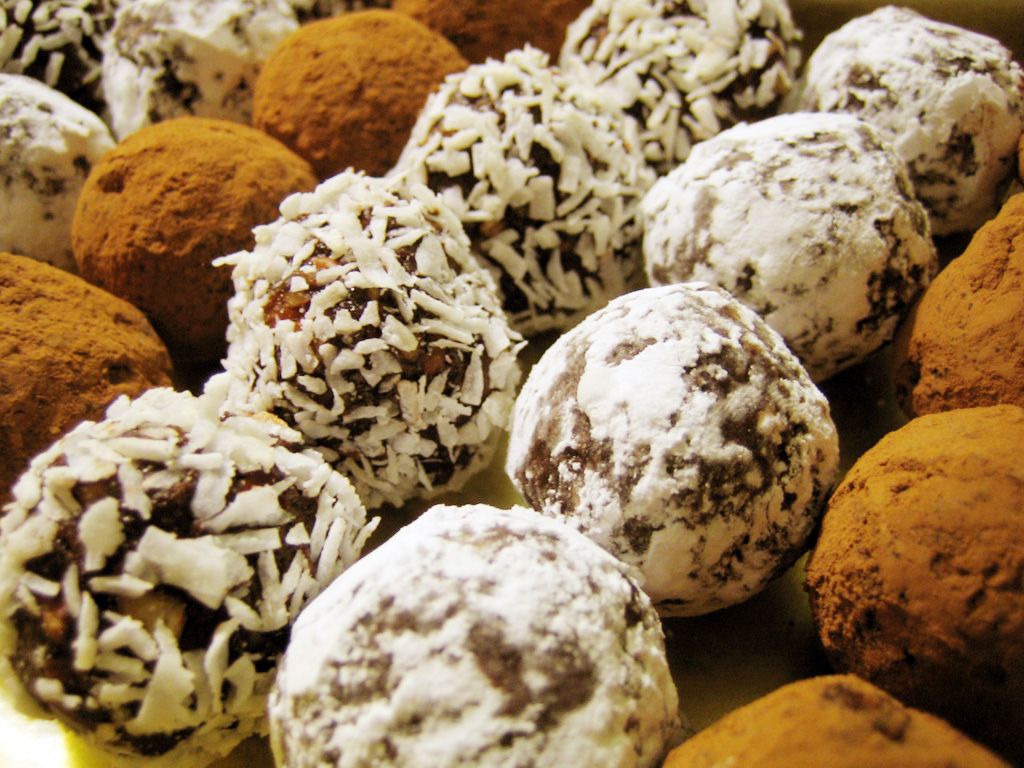
All of my Christmas shopping has been done and I just finished my last holiday sweet this evening. Phew! I love giving away pretty containers filled with homemade treats during the holidays and this year's bounty is pretty impressive. I've made a batch of pretty iced Ginger Gems, some white chocolate candy cane bark, plenty of dark chocolate salted mixed nut bark, Orangette's building blocks (with salted mixed nuts, raisins, candied ginger & dried cranberries) and my yummy fleur de sel caramels. But I felt something was missing so I dug into my bag of tricks and came up with rum balls!
I'm totally new to the world of rum balls...a recent convert so to speak. One afternoon during a long walk on Commercial Drive (a street known for it's hippies, Italian community and local food spots), Cornelius put me up to a rum ball challenge. We stopped off at 3 different bakeries and tried rum balls at all 3 just so that we could figure out which bakery made the best one. So you better trust that even though I'm new to the rum ball existance, I'm certainly no slacker when it comes to determining what makes a great rum ball. And these, my friends, are great rum balls! A great holiday cookie indeed. Since these are no-bake cookies, the rum flavour doesn't burn off and they've got enough of a kick to keep a smile on your face during whatever holiday stress you encounter.
I don't have a food processor, so I chopped all the pecans by hand. This works really well for this recipe because a nice nutty texture is best here and you don't want to end up with a messy paste of finely ground nuts. If you don't have chocolate cookies, give gingersnaps or shortbread a try!
rum balls
1 1/2 c pecans
1 1/4 c chocolate wafer cookies
1/2 c powdered sugar
1/4 t cinnamon
2 T cocoa powder
2 T corn syrup
1/4 c amber rum
+ powdered sugar, grated coconut and sweetened cocoa powder
1. Toast the pecans in a 350 degree oven until fragrant (about 10 minutes). Let cool and then chop finely. While pecans are toasting, crush chocolate wafers until fine.
2. In a large bowl, combine crushed pecans, gingersnaps, powdered sugar, cinnamon, and cocoa and stir until well mixed. Add in the rum and corn syrup and mix well. Chill for at least 1 hour.
3. Roll 1 teaspoon of the mixture into balls and roll in your choice of powdered sugar, grated coconut or cocoa powder.
Makes 28 balls...so go ahead and double the recipe!
have a boozy christmas
All of my Christmas shopping has been done and I just finished my last holiday sweet this evening. Phew! I love giving away pretty containers filled with homemade treats during the holidays and this year's bounty is pretty impressive. I've made a batch of pretty iced Ginger Gems, some white chocolate candy cane bark, plenty of dark chocolate salted mixed nut bark, Orangette's building blocks (with salted mixed nuts, raisins, candied ginger & dried cranberries) and my yummy fleur de sel caramels. But I felt something was missing so I dug into my bag of tricks and came up with rum balls!
I'm totally new to the world of rum balls...a recent convert so to speak. One afternoon during a long walk on Commercial Drive (a street known for it's hippies, Italian community and local food spots), Cornelius put me up to a rum ball challenge. We stopped off at 3 different bakeries and tried rum balls at all 3 just so that we could figure out which bakery made the best one. So you better trust that even though I'm new to the rum ball existance, I'm certainly no slacker when it comes to determining what makes a great rum ball. And these, my friends, are great rum balls! A great holiday cookie indeed. Since these are no-bake cookies, the rum flavour doesn't burn off and they've got enough of a kick to keep a smile on your face during whatever holiday stress you encounter.
I don't have a food processor, so I chopped all the pecans by hand. This works really well for this recipe because a nice nutty texture is best here and you don't want to end up with a messy paste of finely ground nuts. If you don't have chocolate cookies, give gingersnaps or shortbread a try!
rum balls
1 1/2 c pecans
1 1/4 c chocolate wafer cookies
1/2 c powdered sugar
1/4 t cinnamon
2 T cocoa powder
2 T corn syrup
1/4 c amber rum
+ powdered sugar, grated coconut and sweetened cocoa powder
1. Toast the pecans in a 350 degree oven until fragrant (about 10 minutes). Let cool and then chop finely. While pecans are toasting, crush chocolate wafers until fine.
2. In a large bowl, combine crushed pecans, gingersnaps, powdered sugar, cinnamon, and cocoa and stir until well mixed. Add in the rum and corn syrup and mix well. Chill for at least 1 hour.
3. Roll 1 teaspoon of the mixture into balls and roll in your choice of powdered sugar, grated coconut or cocoa powder.
Makes 28 balls...so go ahead and double the recipe!
Wednesday, October 25, 2006
the not-so-humble crumble
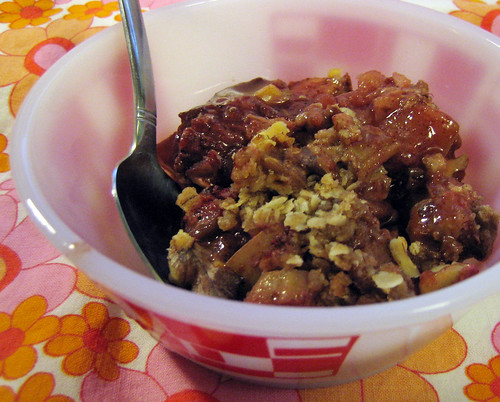
One of the easiest desserts ever is the humble crumble. Or crisp. Whatever you call it, it barely calls for a recipe and it's delicious. When a crumble presents itself on the table, Cornelius is ready to bow down in its greatness. He looks down at me (he is well over six feet tall) with utter love in his eyes, "You made this for me?". It's a win-win situation. In talking about preparation, Cornelius is all for purity. "Two fruits, max", he lets me know. To me, that's just too little and always too late. Why settle for just 2 fruits when three kinds of fruit will just make everything better. Hell, I've been known to add four kinds of fruit...the more the merrier!
This crumble is a compromise. A three fruit marriage that isn't meant to last. In fact, I was hoping to eat this for breakfast the next morning with a plop of coconut yogurt, but Cornelius finished the leftovers before bed.
three fruit crumble
2 stalks of rhubarb, chopped into half moons
1 granny smith apple, diced
1 cup of strawberries, cut in half or quarters (I used frozen)
1/4 c - 1/2 c brown sugar (or so, depending on the sweetness of the fruit)
2 t cinnamon
1 large pinch of ground cardamon
1/4 t ground cloves
1 large pinch of nutmeg
1. Mix all the above into a medium sized oven proof dish, covering all the fruit with the sugar and spices.
2. Prepare the crumble topping:
2 T oats
2 T flour
2 T brown sugar
2 T cold butter (or vegan margerine)
2 T chopped walnuts
In a small bowl, blend topping ingredients (except walnuts) with your fingers. Stop when crumble resembles small peas. Pour over top of fruit and sprinkle with chopped walnuts. Bake in a 350 degree oven for 45 minutes or until fruit becomes soft and juicy and crumble turns golden brown.
the not-so-humble crumble
One of the easiest desserts ever is the humble crumble. Or crisp. Whatever you call it, it barely calls for a recipe and it's delicious. When a crumble presents itself on the table, Cornelius is ready to bow down in its greatness. He looks down at me (he is well over six feet tall) with utter love in his eyes, "You made this for me?". It's a win-win situation. In talking about preparation, Cornelius is all for purity. "Two fruits, max", he lets me know. To me, that's just too little and always too late. Why settle for just 2 fruits when three kinds of fruit will just make everything better. Hell, I've been known to add four kinds of fruit...the more the merrier!
This crumble is a compromise. A three fruit marriage that isn't meant to last. In fact, I was hoping to eat this for breakfast the next morning with a plop of coconut yogurt, but Cornelius finished the leftovers before bed.
three fruit crumble
2 stalks of rhubarb, chopped into half moons
1 granny smith apple, diced
1 cup of strawberries, cut in half or quarters (I used frozen)
1/4 c - 1/2 c brown sugar (or so, depending on the sweetness of the fruit)
2 t cinnamon
1 large pinch of ground cardamon
1/4 t ground cloves
1 large pinch of nutmeg
1. Mix all the above into a medium sized oven proof dish, covering all the fruit with the sugar and spices.
2. Prepare the crumble topping:
2 T oats
2 T flour
2 T brown sugar
2 T cold butter (or vegan margerine)
2 T chopped walnuts
In a small bowl, blend topping ingredients (except walnuts) with your fingers. Stop when crumble resembles small peas. Pour over top of fruit and sprinkle with chopped walnuts. Bake in a 350 degree oven for 45 minutes or until fruit becomes soft and juicy and crumble turns golden brown.
Thursday, September 14, 2006
a nice evening for a date
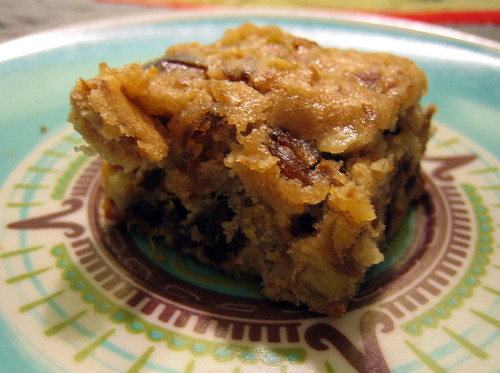
During the summer I had an unabashed addiction to Larabars. Raw, natural and delicious, I was partial to the Cherry Pie, Chocolate Mint and the Chocolate Coconut bars but didn't want to spend all my hard-earned cash on those pricey treats. So instead I headed to the grocery store, bought a bag of dates and figured I'd make my own. Unfortunately, when I got home I realized that making Larabars would probably necessitate the use of a food processor (which I don't have) and I didn't feel like finely mincing up dates by hand. What can I say, I can be a lazy bugger at times. Instead, I put those dates away in the cupboard for a less labour intensive use. Weeks had gone by and I kept those dates on the brain. I began to think about making some traditional oatey date squares, or matrimonial cakes, as they are sometimes known as but I never remembered to ask my mom for her traditional recipe. Instead, I made these chewy, nutty squares that resemble a chewy blondie rather than a traditional date square. Not only do these use applesauce in place of butter, but along with a pot of hot tea, it helps to take the chill off a damp evening. It may not be raw or low fat (damn, those nuts!), but these bars are delicious. Yum.
chewy date-nut squares
1 1/4 c pitted dates, finely chopped
2 T rum
1 egg
1/4 c applesauce
1/4 c white sugar
1/4 c all-purpose flour
1/2 t baking powder
1 c walnuts, chopped
1. Heat oven to 350 degrees and lightly grease a 9-inch square pan.
2. In small bowl, mix dates and rum and set aside.In a large bowl beat egg until frothy. Add in applesauce and sugar and mix until pale. Beat in flour and baking powder just until blended. Stir in walnuts and rum-date mixture. Spread in pan.
3. Bake about 30 minutes, until edges are golden and the centre is firm to the touch. Cool in pan and then cut into squares.
Tuesday, August 30, 2005
brownies
Last night, we needed something sweet after our dinner (sandwiches!), so I went to my old standby favorite, Moosewood Restaurant Cooks at Home cookbook's brownie recipe. It's easy to make and it turns out perfect everytime*. I added lots of walnuts in my version, cuz that's how I roll!
Moosewood Fudge Brownies
Recipe from Moosewood Restaurant Cooks at Home
1/2 c butter (1 stick)
3 oz unsweetened chocolate
1 c lightly packed brown sugar
1/2 t pure vanilla extract
2 eggs, lightly beaten
1/2 c unbleached white flour
Preheat the oven to 350. Lightly coat an 8- or 9-inch square baking pan with cooking spray.
In a pot large enough to hold all of the batter, melt the butter and chocolate together on low heat, stirring occasionally. Remove from the heat. Add the brown sugar and vanilla and beat by hand or with an electric mixer. Add the eggs and beat well. Stir in the flour and mix until the batter is thoroughly blended and smooth.
Pour the batter into the prepared pan and bake for about 20 minutes, until the brownies are just beginning to pull away from the sides of the pan and are still fudgy in the center. If you prefer more cake-like brownies, bake an additional 5 minutes.
*Okay, the only time they didn't come out stellar was when Cornelius wasn't paying attention to the recipe and used an entire cup of butter instead. We ate it up anyway and it still wasn't horrible.
Sunday, May 8, 2005


Thursday, April 28, 2005
a photo, finally....with strawberry shortcake

Last weekend for my soon-to-be mother-in-law's birthday, I made a strawberry shortcake. this incredibly easy strawberry shortcake recipe to be exact. It tasted as great as it looked. I've actually never made or even eaten a strawberry shortcake before, so I wasn't sure if I was making it correctly. The cake batter was heavy and thick, so I figured the batter would turn out much more like a biscuit than a cake. It did, which was a perfect texture for soaking up all the berry juice. It wasn't overly sweet and it made the most perfect dessert.
I'm also extra happy for the under $5 glass cake plate & dome that we got on clearance! Pretty as a picture!
Best Strawberry Shortcake
(from Nick Malgieri)
Filling
4 c sliced fresh strawberries
2 T sugar
1 c heavy whipping cream
2 T sugar
1/2 t vanilla extract
Shortcake
2 c self-rising flour
2 T sugar
8 T unsalted butter
1 large egg
2/3 c cream
1 8-inch pan, buttered, lined with parchment or wax paper
1. To make filling, combine sliced berries and sugar and allow to macerate, covered, in the refrigerator for several hours before serving. Whip cream with sugar and vanilla, cover and refrigerate.
2. For the shortcake, preheat oven to 450 degrees and set a rack in the middle level.
3. Combine flour and sugar in bowl of a food processor outfitted with the metal blade and pulse several times to mix. Cut butter into 8 pieces and add. Pulse 12 to 15 times to reduce to fine crumbs. Whisk egg and cream together and add. Pulse several times to mix. At this point the dough will be very soft. Scrape dough into prepared pan and smooth top. Bake until well colored and firm, about 15 to 20 minutes. Invert from pan to a rack to cool.
4. To assemble, split shortcake and place one round on a platter. Top with half the berries and half the cream. Place second layer of shortcake on top of cream and repeat with remaining berries and cream. Serve immediately.


